
Tig Welding Gas Lens vs Diffuser Setup, Which is Better For Stainless?
A TIG Welding Gas Lens vs. Diffuser Setup for Stainless Steel
TIG welding stainless steel is a FUSSY metal which can become oxidized really easily. We’re all familiar with those grey, dull looking welds… This is all controlled and determined by the gas we use and how we control the heat, and today we’re going to experiment comparing two popular setups: the gas lens and the diffuser. I set up my machine and used identical settings for each , so let’s see which method provides superior results in terms of gas stability, oxide control, and overall weld quality.
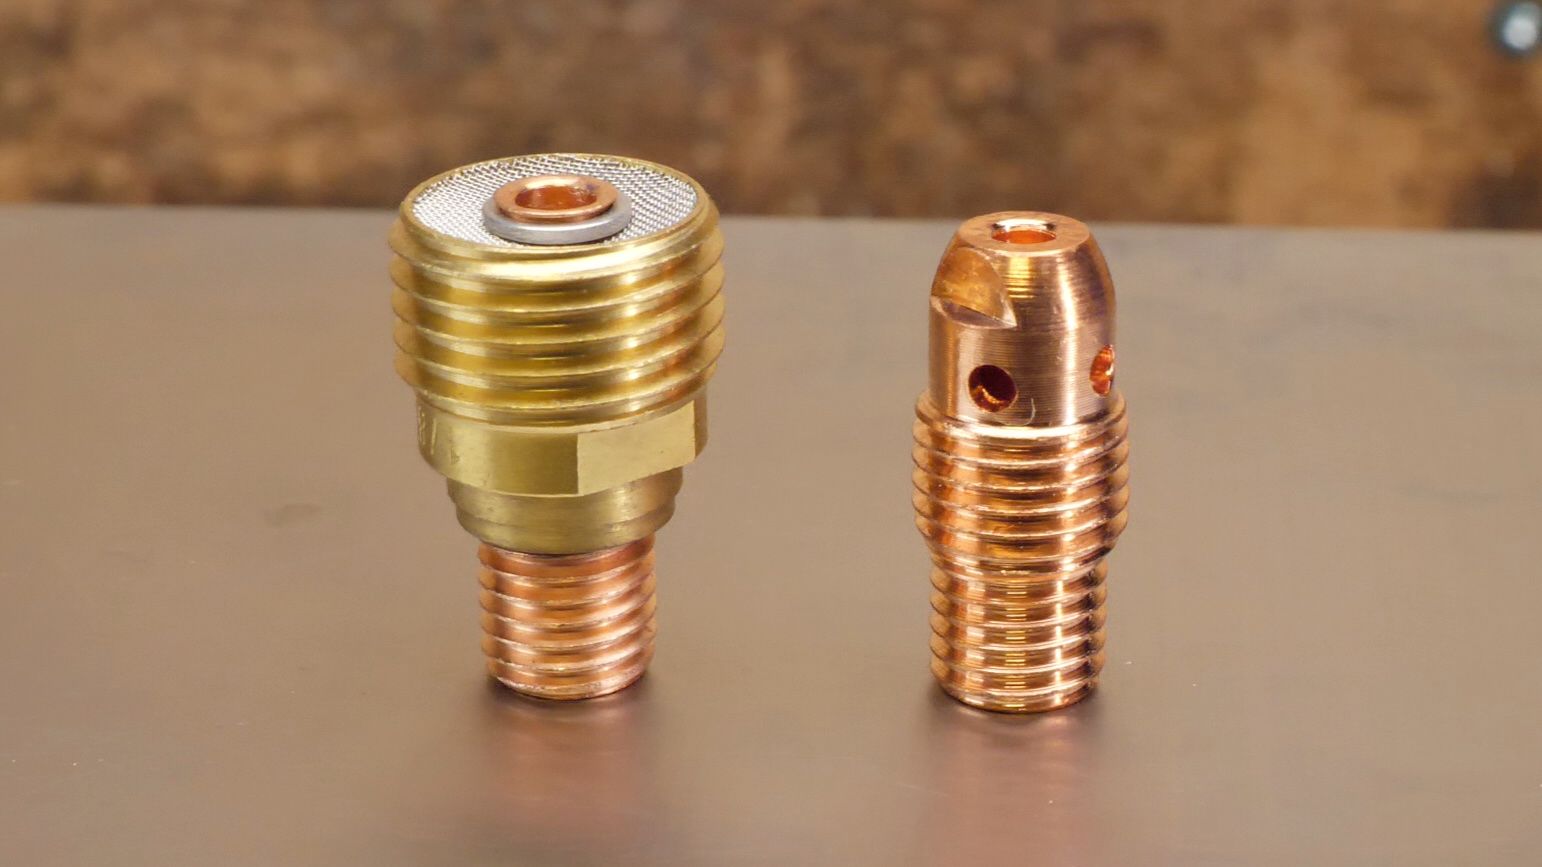
Understanding the Setups
Both the gas lens and diffuser setups serve the purpose of delivering shielding gas to the welding area, but they do so in different ways. The gas lens uses a screen to provide a smoother and more controlled gas flow, while the diffuser relies on smaller gas ports.
Differences in Gas Delivery and Puddle Stability
In the diffuser setup, gas is expelled through small ports, which can lead to less stable gas coverage under some circumstances. In contrast, the gas lens setup employs a gas screen, resulting in a more consistent and stable flow. This stability is particularly crucial when welding stainless steel, as it will keep the puddle more stable and less wobbly. This is especially helpful when welding around shapes (anything not straight, flat, or constant in joint setup.) With a diffuser setup travelling around shapes and welding profiles that change, it is common that the stability of the puddle will become difficult to control. The puddle can become wobbly and unstable which will make adding filler more challenging, as well as create potential for an uneven weld between surfaces needing to be joined. Using a gas lens will be a setup that can absolutely create more versatility with puddle stability (providing that gas volumes, cup sizes and machine settings are correct,) when welding around shapes or changing surfaces and joint configurations.
So let’s set up some specific joints that I teach in my Online Tig Welding Program. The practice material is 1mm (approx .040) 304 Stainless Steel. I used a 2.4mm (3/32") diameter tungsten with a #8 cup for this blog post here. However we will keep these straightforward and compare some differences. If you want to follow along with diagrams and video, watch the FULL LESSON HERE.
Flat Pass Comparison
Flat passes can be easily done with both setups. The gas lens setup provided a stable arc and smooth filler material integration, resulting in a clean and shiny weld. In contrast, the diffuser setup exhibited a bit of wobbliness at the start of the pass and required more time for stabilization, leading to a duller finish and a wider heat affected zone due to slightly more overall heat input. However, if gas was adjusted to compensate for a few extra seconds of puddle stabilization a better finish could be achieved with a diffuser setup, however the travel speed and overall HAZ with the gas lens would be much more consistent and controlled with the gas lens setup on a flat pass.
Fillet Joint Performance
Next, I welded a fillet joint configuration. The gas lens setup continued to perform well, maintaining excellent stability and control. However on this joint, surprisingly the diffuser setup also yielded good results in this configuration, I found this was likely due to the joint's tighter included angle that helped keep the gas contained or local to the welding area which helped to keep the weld covered and surrounding HAZ. The results were slightly cleaner and more controlled with the gas lens, but the work done with the diffuser setup turned out great, and without any adjustments with settings or gas volume.
Challenges with Outside Corner Joints
The outside corner joint presented some difficulties to consider for both setups. Because the configuration of the joint does nothing to help keep the gas local to the welding area, (basically the opposite of the previous joint,) each setup had to make up for dealing with this difficulty with this joint configuration. The gas lens setup stabilized well, but even with good gas volume and a steady puddle, the gas flowing away from the welding area made for a more pronounced HAZ and slightly more oxide colouring to form. Because of these new variables with this joint, the diffuser setup struggled significantly, with poor stabilization and erratic gas flow, resulting in an inconsistent weld and considerably more oxide and HAZ. To achieve better results with a diffuser setup major adjustments in gas flow, cup size, and gas volume would have to be made.
Wrapping Up!
Through this comparison of gas lens and diffuser setups in TIG welding, it is clear that both have their merits. While the diffuser can deliver satisfactory results under specific conditions (like some joint configurations, and making adjustments with settings and gas flow for each joint), the gas lens setup offers a much more general stability and control. The gas lens setup would require much less tinkering with settings and gas flow, and would be much more of a widely applicable setup for stainless steel.
Ultimately, the choice between setups may depend on individual preferences and specific project requirements. I recommend to experiment with your own setup and see the results you can get with either step, especially with a diffuser setup. I think you will see that you can get great results no matter what setup you have access to, and you’ll learn a ton experimenting to find what works best. Watch the lesson on this post RIGHT HERE, and happy welding!
-Dusty James
Download your exclusive Beginner's Guide to Aluminum TIG Welding!
Enter your information below to receive exclusive PDF mini-textbook straight to your email.
We hate SPAM. We will never sell your information, for any reason.
