

The Real Secret to Better Stainless TIG
Stainless TIG Got You Frustrated? Master the HAZ and Watch Your Welds Change Overnight
Ever lay down a stainless weld that looked more like burnt toast than a clean stack of gold coins? Yeah, we’ve all been there. Truth is—stainless TIG can be a love-hate relationship if you don’t understand what’s actually happening under that arc.
Here’s the game changer: it’s all about the HAZ (heat-affected zone). Nail that, and everything else starts falling into place.
Let’s break it down, nice and simple.
The Usual TIG Myths That Get in the Way
You’ve probably heard these before:
-
“Just lower the amps, bro.”
-
“Crank the gas up.”
-
“Maybe you just need some better gear.”
Look, those things can help... sometimes. But if you’re still not getting that controlled, gold finish—it’s your heat control.
It’s Not Just “Too Hot”
If your welds look grey, dull, or sugared, the default reaction is: “Turn the heat down!”
But here’s the deal—if your welds are sunken or the toes aren’t blending, you might already be underheating. Don’t just chase low amps blindly. You’ve gotta understand the HAZ.
More Gas Won’t Fix Technique
Shielding gas is important—no doubt—but if your technique is off, all the argon in the world won’t clean that up. Focus on how you’re moving, your heat input, and how long you’re letting the puddle establish.
Fancy Gear ≠ Magic Welds
Good gear is great, but it won’t make up for poor control. You don’t need top-shelf equipment to lay down clean welds. What you do need is an understanding of what your heat is doing—and that brings us right back to the HAZ.
What’s the HAZ Anyway?
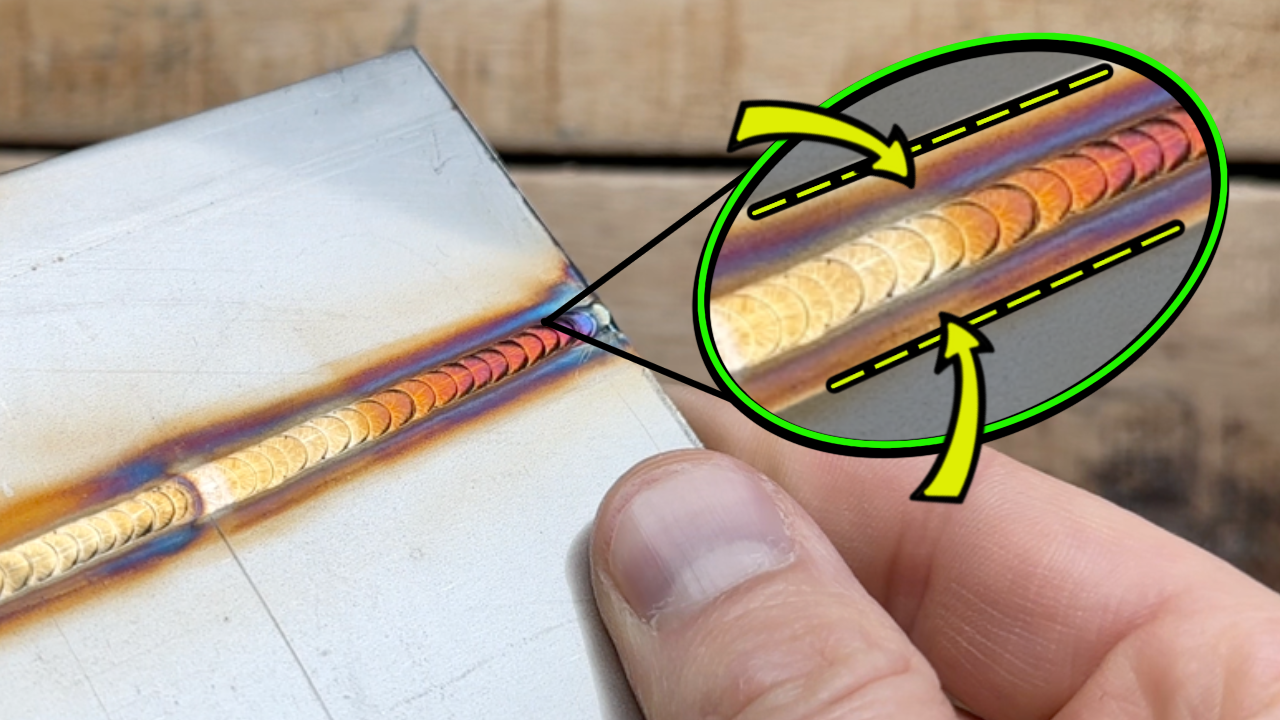
The HAZ is the area around your weld that’s been cooked by the heat. Most people spend time looking at the weld itself, but the weld is the area that turns out well, only if this area of the HAZ has been controlled like this example above. You can see a bit of colour, but the HAZ is narrow, and it stays consistent from start to finish. If your HAZ is wide, becomes inconsistent from start to finish, or grey or oxidized, that’s your weld crying for help.
What You Want to See
Dialled-in HAZ = clean, controlled weld.
You’re aiming for:
-
A narrow, even band of HAZ on both sides
-
Good edge blending into the base metal
-
Just a hint of colour—gold is the sweet spot
If it’s gray or dull, the heat input has stacked up and become too high, and your gas isn't able to keep up. Simple as that. A little bit of colour is all good, just make sure that the coloured areas are shiny and reflective, not dull.
How I Control the Heat
The magic is in how you balance:
-
Amperage
-
Travel speed
-
Filler input
Slow down at the start, wait for that puddle, add filler, then cruise along at a steady pace. Don’t rush it, but don’t hang out too long either.
Pro Tips for Finishing the Weld
When you finish a pass:
-
Ease off the pedal slowly
-
Hold your torch in place for the entire post flow cycle to finish, plus an extra 2–3 seconds
-
Let the post flow do its thing
That’s how you avoid oxidation and get that clean, shiny finish.
Backside of the Weld—Don’t Sleep on It
Flip it over—if it’s crusty or sugared, your heat’s out of control. With the right technique and heat control, you’ll see clean penetration and minimal oxidation. That’s the goal.
Quick Fix: Narrow That Puddle
If things are looking rough, try decreasing your puddle width. Especially on thin material. A narrower lane means more control and less oxide. Simple change, big results.
Want More Help?
If this stuff has you fired up to learn more, I’ve got a free stainless TIG class that walks through all of this in more detail. It’s like sitting in on a full workshop—settings, setup, heat control, and more.
👉 Jump Into The Free Class Here
Final Words
Forget all the fluff. If your stainless welds aren’t clean, start by mastering your heat-affected zone. Everything else will start clicking into place once you do. It’s not about doing more, it’s about doing it right.
P.S. I’ve covered all of this in this training video here—so if you’re more of a visual learner, go - Watch The Episode Here
Keep at it,
Dusty
Download your exclusive Beginner's Guide to Aluminum TIG Welding!
Enter your information below to receive exclusive PDF mini-textbook straight to your email.
We hate SPAM. We will never sell your information, for any reason.
